Your code can’t modify Revit projects without a Transaction. Knowing how to use transactions can save you from frustrating code-breaking errors.

📌 TLDR – Summary Upfront:
Use the Transaction class when your code modifies Revit projects (e.g., create or edit elements).
➡️ Create and Start a transaction before the project-modifying code.
➡️ Commit the transaction to save changes.
➡️ Or RollBack the transaction to discard changes if something goes wrong.
🔍Content:
What are Transactions and when to use them
A transaction encapsulates changes, ensuring they can be committed (saved) or rolled back (undone) if something goes wrong. Any modification to a project through Revit API must happen inside a transaction. If you try to modify a document outside of an active transaction, Revit will throw an error.
Generally, use the Transaction class whenever your code modifies a Revit project. Some methods handle transactions internally, and others can’t be called within an active transaction. The rules aren’t strict, but don’t worry — if you encounter an error, Revit will indicate if a transaction is required or prohibited. And over time, you’ll develop a “transaction intuition.”
Classes: Transaction, SubTransaction and TransactionGroup
Revit API provides 3 main classes for handling transactions:
- Transaction (the primary class)
- SubTransaction (to group smaller changes)
- TransactionGroup (to group multiple transactions)
In practice, the Transaction class is all you need. SubTransaction and TransactionGroup can help organize code but are rarely used.
Transaction Class: Start, Commit and Rollback
Transaction class has three key methods:
- Start: Begins the transaction before any changes.
- Commit: Saves changes to the document.
- RollBack: Discards changes if something goes wrong.
Use try-catch blocks to ensure the transaction commits if everything goes as planned, or rolls back in case of errors.
using var transaction = new Transaction(doc, "Creating families with my Transaction");
try
{
	transaction.Start();

	// document-modifying code goes here, for example:
	doc.Create.NewFamilyInstance(insertionPoint, familySymbol, StructuralType.NonStructural);
	doc.Create.NewFamilyInstance(insertionPoint, familySymbol2, StructuralType.NonStructural);

	transaction.Commit();
}
catch
{
	transaction.RollBack();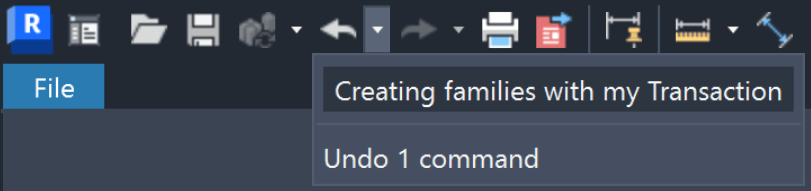
}Transactions in Revit: Effect on the UI
Revit treats the entire transaction as a single operation. It will appear as one entry in Revit’s Undo menu, allowing users to undo or redo.